屏幕
micropython
https://micropython.org/download/ESP32_GENERIC/
模拟器 https://wokwi.com/
模拟配置文件diagram.json
LCD1602
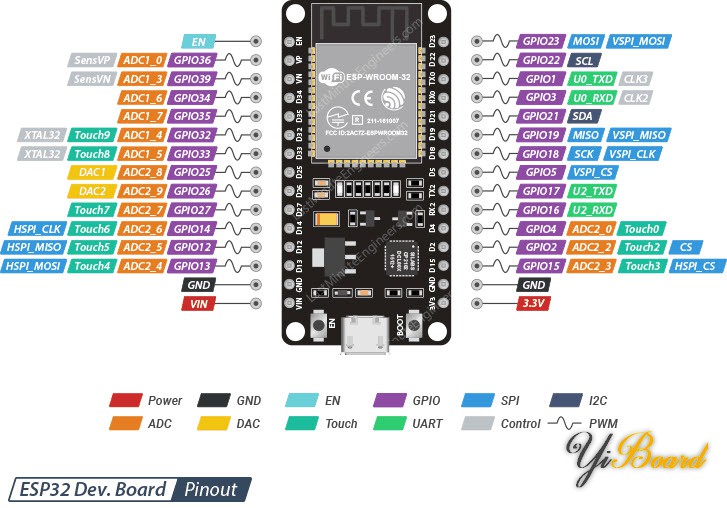
i2c通信协议
scl=22 , sda=21
from machine import I2C, Pin
import time

# LCD 常量定义
LCD_ADDRESS = 0x27  # I2C 地址(可能是 0x3F,具体根据你的屏幕)
LCD_WIDTH = 16      # 每行字符数
LCD_CHR = 1         # 发送数据
LCD_CMD = 0         # 发送命令

# LCD 命令
LCD_LINE_1 = 0x80   # 第一行起始地址
LCD_LINE_2 = 0xC0   # 第二行起始地址
LCD_BACKLIGHT = 0x08  # 背光开
ENABLE = 0b00000100  # Enable bit

# 初始化 I2C  分配引脚
i2c = I2C(0, scl=Pin(22), sda=Pin(21), freq=400000)

def lcd_write(byte, mode):
    """发送命令或数据到 LCD"""
    bits_high = mode | (byte & 0xF0) | LCD_BACKLIGHT
    bits_low = mode | ((byte << 4) & 0xF0) | LCD_BACKLIGHT
    i2c.writeto(LCD_ADDRESS, bytearray([bits_high, bits_high | ENABLE, bits_high & ~ENABLE]))
    i2c.writeto(LCD_ADDRESS, bytearray([bits_low, bits_low | ENABLE, bits_low & ~ENABLE]))
    time.sleep_us(50)

def lcd_init():
    """初始化 LCD 屏幕"""
    lcd_write(0x33, LCD_CMD)  # 初始化
    lcd_write(0x32, LCD_CMD)  # 设置为 4 位模式
    lcd_write(0x06, LCD_CMD)  # 光标移动方向
    lcd_write(0x0C, LCD_CMD)  # 打开显示,不显示光标
    lcd_write(0x28, LCD_CMD)  # 2 行模式
    lcd_write(0x01, LCD_CMD)  # 清屏
    time.sleep(0.1)

def lcd_clear():
    """清除 LCD 屏幕"""
    lcd_write(0x01, LCD_CMD)
    time.sleep(0.1)

def lcd_message(message, line):
    """在指定行显示消息"""
    if line == 1:
        lcd_write(LCD_LINE_1, LCD_CMD)
    elif line == 2:
        lcd_write(LCD_LINE_2, LCD_CMD)

    for char in message:
        lcd_write(ord(char), LCD_CHR)

# 初始化 LCD 并显示消息
lcd_init()
lcd_clear()

lcd_message("hello", 1)  # 第一行显示 "hello"
lcd_message("world", 2)  # 第二行显示 "world"
MAX7219
spi通信协议
sck=18,mosi(DIN)=19,cs=2
使用https://github.com/mcauser/micropython-max7219/blob/master/max7219.py库
4块屏幕8*32
| 名称 | 功能 |
|---|---|
| MOSI | 主输出-从输入 |
| MISO | 主输入-从输出 |
| SCLK | 同步时钟线 |
| CS | 片选线 |
代码点亮
from machine import Pin, SPI
import max7219
from time import sleep

# 初始化 SPI 接口
spi = SPI(1, baudrate=10000000, polarity=0, phase=0, sck=Pin(18), mosi=Pin(19))

# 初始化 MAX7219
cs = Pin(5, Pin.OUT)  # CS 引脚
num_matrices = 3       # 点阵模块数量(24 列 / 8 列 = 3 模块)
display = max7219.Matrix8x8(spi, cs, num_matrices)

# 清屏并设置亮度
display.brightness(1)  # 设置亮度(0-15)
display.fill(0)        # 清屏
display.show()

# 显示文字
text = "hello 1234567890  "  # 循环滚动的文字
while True:
    for i in range(len(text) * 8):  # 每个字符占 8 列
        display.fill(0)
        display.text(text, -i, 0, 1)  # 滚动文字
        display.show()
        sleep(0.1)  # 滚动速度调整(单位:秒)
esphome点亮
# SPI 总线配置
spi:
  clk_pin: GPIO18
  mosi_pin: GPIO19

# 配置 Max7219 LED 屏幕

display:
  - platform: max7219digit
    id: max7219_display
    cs_pin: GPIO5
    num_chips: 4
    intensity: 8
    lambda: |-
      it.print(0, 0, id(my_font), "HELLO! World");


time:
  - platform: homeassistant
    id: homeassistant_time

font:
  - file: "fonts/arial.ttf"
    id: my_font
    size: 8
switch:
  - platform: template
    name: "Display Power"
    id: display_power
    turn_on_action:
      - logger.log: "Display is ON"
      - lambda: |-
          id(max7219_display).turn_on_off(true);
    turn_off_action:
      - logger.log: "Display is OFF"
      - lambda: |-
          id(max7219_display).turn_on_off(false);

number:
  - platform: template
    name: "Display Brightness"
    id: display_brightness
    min_value: 0
    max_value: 15
    step: 1
    restore_value: true
    initial_value: 8
    set_action:
      - lambda: |-
          id(max7219_display).set_intensity((int)x);
加了实体后有问题
自定义文本
固件绑定传感器数值+lambda动态函数显示
# SPI 总线配置
spi:
  clk_pin: GPIO18
  mosi_pin: GPIO19

# 配置 Max7219 LED 屏幕

display:
  - platform: max7219digit
    cs_pin: GPIO5
    num_chips: 4
    intensity: 2
    id: max7219_display
    update_interval: 1s  # 每秒更新一次显示
    lambda: |-
      // 获取文本传感器的值
      const char* text = id(display_text).state.c_str();
      // 在屏幕上显示文本
      it.print(0, 0, id(my_font), text);
# 添加文本传感器
text_sensor:
  - platform: homeassistant
    name: "Display Text"
    id: display_text
    entity_id: input_text.max7219_display_text  # 绑定到 Home Assistant 的 input_text 实体


font:
  - file: "fonts/calibril.ttf"
    id: my_font
    size: 8
修改hass系统 configuration.yaml 文件添加一个文本传感器,设置后重启生效
input_text:
  max7219_display_text:
    name: " max7219 Display Text"
    initial: "Hello Input"
    max: 16  # 最大字符数(根据屏幕宽度调整)
HUB75
HUB75 RGB LED 模块 16针
屏幕实际像素为 高64像素宽128像素 屏幕物理宽高 16*32cm
| 编号 | 孔位 | 孔位 | 编号 |
|---|---|---|---|
| R1 | 1 | 2 | G1 |
| B1 | 3 | 4 | GND |
| R2 | 5 | 6 | G2 |
| B2 | 7 | 8 | GND/E |
| A | 9 | 10 | B |
| C | 11 | 12 | D |
| CLK | 13 | 14 | LAT |
| OE | 15 | 16 | GND |
以下是你的 HUB75 RGB 屏幕引脚说明,以及每个引脚的功能解释:
pcb对应引脚
| 引脚 | 引脚 |
|---|---|
| GPIO13--OE, | GND--GND, |
| GPIO19--CLK, | GPIO5--LAT, |
| GPIO14--C, | GPIO18--D, |
| GPIO26--A, | GPIO12--B, |
| GPIO25--B2, | GPIO23--E, |
| GPIO33--R2, | GPIO15--G2, |
| GPIO2--B1, | GND--GND, |
| GPIO4--R1, | GPIO32--G1, |
三色交替显示
from machine import Pin
import time

# 引脚定义
OE = Pin(13, Pin.OUT)  # 输出使能
CLK = Pin(19, Pin.OUT)  # 时钟信号
LAT = Pin(5, Pin.OUT)  # 数据锁存
A = Pin(26, Pin.OUT)  # 行选择 A
B = Pin(12, Pin.OUT)  # 行选择 B
C = Pin(14, Pin.OUT)  # 行选择 C
D = Pin(18, Pin.OUT)  # 行选择 D
E = Pin(23, Pin.OUT)  # 行选择 E
R1 = Pin(4, Pin.OUT)  # 上半部分红色
G1 = Pin(32, Pin.OUT)  # 上半部分绿色
B1 = Pin(2, Pin.OUT)  # 上半部分蓝色
R2 = Pin(33, Pin.OUT)  # 下半部分红色
G2 = Pin(15, Pin.OUT)  # 下半部分绿色
B2 = Pin(25, Pin.OUT)  # 下半部分蓝色

# 屏幕参数
MATRIX_WIDTH = 1 # 屏幕宽度
MATRIX_HEIGHT = 32  # 屏幕高度

# 初始化引脚
def init_pins():
    OE.value(1)  # 禁止显示(高电平关闭屏幕)
    LAT.value(0)  # 初始化锁存
    CLK.value(0)  # 初始化时钟
    A.value(0)
    B.value(0)
    C.value(0)
    D.value(0)
    E.value(0)
    R1.value(0)
    G1.value(0)
    B1.value(0)
    R2.value(0)
    G2.value(0)
    B2.value(0)

# 设置行选择
def set_row(row):
    A.value(row & 0x01)
    B.value((row >> 1) & 0x01)
    C.value((row >> 2) & 0x01)
    D.value((row >> 3) & 0x01)
    E.value((row >> 4) & 0x01)

# 刷新一行
def refresh_row(row, color):
    set_row(row)  # 设置当前行
    for col in range(MATRIX_WIDTH):  # 屏幕宽度为 128
        # 设置颜色
        R1.value(color[0])
        G1.value(color[1])
        B1.value(color[2])
        R2.value(color[0])
        G2.value(color[1])
        B2.value(color[2])

        # 时钟信号
        CLK.value(1)
        CLK.value(0)

    # 锁存数据
    LAT.value(1)
    LAT.value(0)

# 刷新整个屏幕
def refresh_screen(color):
    for row in range(MATRIX_HEIGHT):  # 每次刷新 64 行
        refresh_row(row, color)

# 主循环
def main():
    init_pins()
    colors = [(1, 0, 0), (0, 1, 0), (0, 0, 1)]  # 红绿蓝
    while True:
        for color in colors:
            start_time = time.ticks_ms()  # 当前时间
            while time.ticks_diff(time.ticks_ms(), start_time) < 1000:  # 持续刷新 1 秒
                OE.value(0)  # 打开屏幕显示
                refresh_screen(color)
                OE.value(1)  # 短暂关闭屏幕,避免刷新时闪烁
                time.sleep_us(50)  # 微小延迟

# 运行主程序
main()
3个像素显示红绿蓝
from machine import Pin
import time

# 引脚定义
pin_config = {
    'a': Pin(26, Pin.OUT),
    'b': Pin(12, Pin.OUT),
    'c': Pin(14, Pin.OUT),
    'd': Pin(18, Pin.OUT),
    'e': Pin(23, Pin.OUT),
    'r1': Pin(4, Pin.OUT),
    'g1': Pin(32, Pin.OUT),
    'b1': Pin(2, Pin.OUT),
    'r2': Pin(33, Pin.OUT),
    'g2': Pin(15, Pin.OUT),
    'b2': Pin(25, Pin.OUT),
    'clk': Pin(19, Pin.OUT),
    'oe': Pin(13, Pin.OUT),
    'lat': Pin(5, Pin.OUT),
}

# 屏幕参数
MATRIX_WIDTH = 128  # 屏幕宽度
MATRIX_HEIGHT = 64  # 屏幕高度

# 初始化引脚
def init_pins():
    for pin in pin_config.values():
        pin.value(0)
    pin_config['oe'].value(1)  # 禁止显示

# 设置行选择
def set_row(row):
    pin_config['a'].value(row & 0x01)
    pin_config['b'].value((row >> 1) & 0x01)
    pin_config['c'].value((row >> 2) & 0x01)
    pin_config['d'].value((row >> 3) & 0x01)
    pin_config['e'].value((row >> 4) & 0x01)

# 刷新一行
def refresh_row(row, color):
    set_row(row)  # 设置当前行
    for col in range(MATRIX_WIDTH):  # 屏幕宽度为 128
        if col < 3:  # 只点亮前3个像素
            pin_config['r1'].value(color[0])
            pin_config['g1'].value(color[1])
            pin_config['b1'].value(color[2])
            pin_config['r2'].value(color[0])
            pin_config['g2'].value(color[1])
            pin_config['b2'].value(color[2])
        else:
            pin_config['r1'].value(0)
            pin_config['g1'].value(0)
            pin_config['b1'].value(0)
            pin_config['r2'].value(0)
            pin_config['g2'].value(0)
            pin_config['b2'].value(0)

        # 时钟信号
        pin_config['clk'].value(1)
        pin_config['clk'].value(0)

    # 锁存数据
    pin_config['lat'].value(1)
    pin_config['lat'].value(0)

# 刷新整个屏幕
def refresh_screen(color):
    for row in range(MATRIX_HEIGHT):  # 每次刷新 64 行
        refresh_row(row, color)
        time.sleep_us(50)  # 微小延迟

# 主循环
def main():
    init_pins()
    colors = [(1, 0, 0), (0, 1, 0), (0, 0, 1)]  # 红绿蓝
    while True:
        for color in colors:
            start_time = time.ticks_ms()
            while time.ticks_diff(time.ticks_ms(), start_time) < 1000:  # 持续刷新 1 秒
                pin_config['oe'].value(0)  # 打开屏幕显示
                refresh_screen(color)
                pin_config['oe'].value(1)  # 短暂关闭屏幕,避免刷新时闪烁
                time.sleep_us(50)  # 微小延迟

# 运行主程序
main()
通过esphome
esphome:
  name: hubleddisplay
  friendly_name: hubleddisplay

esp32:
  board: esp32dev
  framework:
    type: arduino

# Enable logging
logger:

# Enable Home Assistant API
api:
  encryption:
    key: "AsB5u4X88wIgcajQ3g04HAs3Y+yedVEWWiNn9TJ9GDg="

web_server:
  port: 80

wifi:
  ssid: "sb"
  password: "100200300"

  # Enable fallback hotspot (captive portal) in case wifi connection fails
  ap:
    ssid: "Myesphom99"
    password: "a123456789"

captive_portal:

external_components:
  - source: github://TillFleisch/ESPHome-HUB75-MatrixDisplayWrapper@main

font:
  - file: "gfonts://Roboto"
    id: roboto
    size: 10

display:
  - platform: hub75_matrix_display
    id: matrix
    width: 128
    height: 64
    R1_pin: 4
    G1_pin: 32
    B1_pin: 2
    R2_pin: 33
    G2_pin: 15
    B2_pin: 25
    A_pin: 26
    B_pin: 12
    C_pin: 14
    D_pin: 18
    E_pin: 23
    LAT_pin: 5
    OE_pin: 13
    CLK_pin: 19
    lambda: |-
      it.print(0, 0, id(roboto), "Hello World!");


switch:
  - platform: hub75_matrix_display
    matrix_id: matrix
    name: "Power"
    id: power

number:
  - platform: hub75_matrix_display
    matrix_id: matrix
    name: "Brightness"
多行显示+日期+中文
esphome:
  name: hubleddisplay
  friendly_name: hubleddisplay

esp32:
  board: esp32dev
  framework:
    type: arduino

# Enable logging
logger:

# Enable Home Assistant API
api:
  encryption:
    key: "AsB5u4X88wIgcajQ3g04HAs3Y+yedVEWWiNn9TJ9GDg="

web_server:
  port: 80

wifi:
  ssid: "sb"
  password: "100200300"

  # Enable fallback hotspot (captive portal) in case wifi connection fails
  ap:
    ssid: "Myesphom99"
    password: "a123456789"

captive_portal:

external_components:
  - source: github://TillFleisch/ESPHome-HUB75-MatrixDisplayWrapper@main

# 定义多种字体
font:
  - file: "gfonts://Courier New"       # 用于日期显示的等宽字体
    id: courier_new
    size: 12
  - file: "fonts/unifont-16.0.02.otf"
    id: sans_cjk
    size: 16
    glyphs: !include all_chars.txt

display:
  - platform: hub75_matrix_display
    id: matrix
    width: 128
    height: 64
    R1_pin: 4
    G1_pin: 32
    B1_pin: 2
    R2_pin: 33
    G2_pin: 15
    B2_pin: 25
    A_pin: 26
    B_pin: 12
    C_pin: 14
    D_pin: 18
    E_pin: 23
    LAT_pin: 5
    OE_pin: 13
    CLK_pin: 19
    lambda: |-
      // 第一行:显示日期,使用 Courier New 字体,红色
      it.printf(0, 0, id(courier_new), Color(255, 0, 0), "%04d-%02d-%02d %02d:%02d:%02d",
                id(homeassistant_time).now().year,
                id(homeassistant_time).now().month,
                id(homeassistant_time).now().day_of_month,
                id(homeassistant_time).now().hour,
                id(homeassistant_time).now().minute,
                id(homeassistant_time).now().second);
      // 第二行:显示中文,使用点阵字体,绿色
      //it.printf(0, 12, FONT_chinese, Color(255, 255, 255), "你好");
      it.printf(0, 12, id(sans_cjk), Color(255, 255, 255), "你好 我很好 谢谢你 我指定你是谁");
      // 第三行:
      it.print(0, 40, id(sans_cjk), Color(0, 0, 255), "Hello好World!");

switch:
  - platform: hub75_matrix_display
    matrix_id: matrix
    name: "Power"
    id: power

number:
  - platform: hub75_matrix_display
    matrix_id: matrix
    name: "Brightness"

# 时间组件,用于获取当前日期
time:
  - platform: homeassistant
    id: homeassistant_time
glyphs: ["你", "好"] # 只编译这两个汉字
打包简易字体思源黑体
pyftsubset D:\Users\NotoSansSC-Regular.ttf --text-file=D:\Users\chars.txt --output-file=D:\Users\subset_font.ttf
提取字体文字
用TTFont读取字体内的所有文字生成all_chars.txt

from fontTools.ttLib import TTFont
矩阵屏
固件
-
Tasmota
mqtt: 前缀 tasmota/discovery
-
ESPHome
屏幕驱动
-
MAX7219 (单色,性价比 8*8点阵) SPI 协议
-
WS2812B (彩色 灯带)
-
hub75 (拼接屏)
# Configure the HUB75 display  没试过
display:
  - platform: hub75
    width: 32             # 屏幕宽度,通常为 64 或 32
    height: 16            # 屏幕高度,通常为 32 或 16
    rgb_order: RGB        # RGB 排列方式 (默认是 RGB,可根据屏幕情况调整为 RBG、GRB 等)
    chain_length: 1       # 串联的屏幕数量
    gpio_pins:            # 定义连接到 ESP32 的 GPIO 引脚
      r1: 25
      g1: 26
      b1: 27
      r2: 14
      g2: 12
      b2: 13
      a: 23
      b: 19
      c: 18
      d: 5
      lat: 4
      oe: 15
      clk: 22
    update_interval: 16ms # 屏幕刷新频率,调整此值可以优化显示效果
hub75库
第三方库
external_components:
  - source:
      type: local
      path: custom_components/hub75
联网
def do_connect():
    import network
    wifi = network.WLAN(network.STA_IF)
    wifi.active(True)
    if not wifi.isconnected():
        print('connecting to network...')
        wifi.connect('sb', '100200300')
        while not wifi.isconnected():
            pass
    print('network config:', wifi.ifconfig())
安装扩展
import mip
mip.install('hub75')